
Australia’s January CPI delivered a double beat — headline inflation held firm at 3.8% year-over-year while the trimmed mean rose to its highest level in 16 months — but a chaotic macro backdrop made the post-event price action anything but straightforward. Which of our four Aussie strategies managed to move beyond the watchlist stage, and how much did geopolitical noise muddy the fundamental signal?
Watchlists are price outlook & strategy discussions supported by both fundamental & technical analysis, a crucial step towards creating a high-quality discretionary trade idea before working on a risk & trade management plan.
If you’d like to follow our “Watchlist” picks right when they are published throughout the week, check out our BabyPips Premium subscribe page to learn more!
The Setup
What We Were Watching: Australia CPI Reports (January 2026)
- Expectation: January 2026 headline CPI to slow to 3.7% annually and just 0.2% m/m, a sharp cooldown from December’s hot 3.8% y/y and 1.0% m/m readings
- Data outcome: Australia’s inflation came in hotter-than-expected at 3.8% y/y and 0.4% m/m, supporting near-term RBA interest rate hike expectations
- Market environment surrounding the event: Markets cautiously leaned back into risk as Asian traders returned from holidays and concerns around AI cooled, with equities seeing some bargain hunting after several days of losses. Still, positioning remained measured surrounding geopolitical developments.
Event Outcome
Australia’s consumer prices rose more than expected in January, while core inflation climbed to its highest level in over a year, solidifying market expectations for another RBA interest rate hike.
The monthly headline CPI rose 0.4% in January, while the more closely watched trimmed mean measure, which is considered a proxy for underlying or “core” inflation, ticked up to 3.4% year-over-year from 3.3% previously, reaching its highest level in 16 months.
Key Takeaways:
- Headline CPI: +0.4% month-on-month; +0.5% seasonally adjusted
- Annual CPI: +3.8% year-over-year, unchanged from December 2025 and well above the RBA’s 2–3% target band.
- Trimmed Mean (Core): +3.4% annually, up from 3.3%, reached the highest reading in 16 months
- Biggest annual contributors: Housing (+6.8%), Clothing & Footwear (+5.6%), Alcohol & Tobacco (+5.0%), Education (+5.4%).
- Electricity costs surged 32.2% year-over-year, driven largely by the expiry of Commonwealth and State Government energy rebates.
- Non-discretionary inflation ran hotter at +4.1% annually vs. discretionary at +3.5%
The Australian dollar, which had been stable leading up to the inflation release, jumped higher across the board upon seeing another set of stronger-than-expected results. After all, the RBA had already hiked interest rates in its latest decision and kept the door open for further tightening should inflation stay elevated.
The Australian currency sustained its bullish reaction as the Asian session progressed, though rallies appeared muted while markets braced for and reacted to Trump’s State of the Union address.
Fundamental Bias Triggered: Bullish AUD Setups
Promotion: Top tier catalysts like Australia’s inflation data can trigger emotional execution. TradeZella AI powered journal turns your raw data into a high-performance playbook. Sync your broker, replay your trades bar-by-bar, and use the Playbook Designer to ensure that next time a central bank surprises the market, you’re executing with clinical precision.
Click on the link to learn more and use code “PIPS20” to save 20%!
Disclosure:We may earn a commission from our partners if you sign up through our links, at no extra cost to you.
Broad Market and Exogenous Drivers:
Tariff Turbulence (Monday–Tuesday): The week opened with markets digesting the Supreme Court’s IEEPA ruling and Trump’s rapid pivot to a 15% global tariff under Section 122 authority — a development that reinforced safe-haven flows broadly and weighed on commodity-linked currencies including AUD. The Aussie recovered tentatively through Tuesday, aided partly by the PBOC’s decision to hold loan rates steady and some tech-sector resilience, though cautious positioning ahead of the State of the Union kept a ceiling on gains.
CPI Catalyst and BOJ Plot Twist (Wednesday–Thursday): Wednesday’s Asia session was the week’s decisive pivot point. Australia’s CPI print landed above expectations and gave AUD a meaningful, sustained lift across the board, with momentum carrying into Thursday’s Asia session. The backdrop was complicated, however, by BOJ political developments — reports of government pressure against further rate hikes had weakened the yen through Tuesday and Wednesday, inadvertently providing some tailwind to AUD/JPY longs, before BOJ hawk Takata’s Thursday London-session remarks triggered a sharp JPY recovery. US-Iran nuclear talk breakdown and a tech sector selloff then compressed risk appetite sharply through Thursday’s US session, applying broad selling pressure to commodity currencies against safe havens/low yielding currencies.
Stagflation Concerns and a Mixed Friday Close (Friday): Friday’s US PPI came in well above consensus at 0.5% m/m (versus 0.3% forecast), briefly lifting the dollar before the move faded into equity weakness and Treasury buying. AUD ended the week as one of the stronger major currencies overall, but the closing sessions were choppy and the clearest opportunities had been concentrated in the immediate post-CPI window on Wednesday.
AUD/USD: Bullish AUD Event Outcome + Risk-On Scenario = Arguably good odds of a net positive outcome
AUD/USD 1-hour Forex Chart Faster with TradingView
The original watchlist identified AUD/USD as the risk-on play for a hawkish CPI outcome. Price was consolidating inside a slightly bearish channel with mid-channel support and the Pivot Point converging near .7064, and the thesis was straightforward: a hotter-than-expected print could attract buyers from that area and clear the way for a push through the descending channel resistance and the R1 at .7113, opening the door to fresh February highs above .7150.
In the days leading up to the release, AUD/USD drifted lower through the channel as risk-off flows from tariff uncertainty and hawkish Fed commentary from Governor Waller weighed on the pair. By the time the CPI release landed on Wednesday, AUD/USD was trading in a band between .7060 and .7070 — precisely the area the watchlist had flagged as a potential demand zone. The fundamental premise had been clearly established.
The reaction was clean. Upon the hotter-than-expected print, AUD/USD jumped sharply, clearing the descending channel resistance and the R1 at .7113 in relatively short order. The pair extended further through the Wednesday and Thursday Asia sessions, touching fresh February highs above .7140 and briefly approaching the .7150 area that the watchlist had outlined as the next significant target. Both the fundamental and technical premises were met: the CPI was hawkish, and price was at the right level when it happened.
The complication, as the watchlist had cautioned, was the surrounding noise. Trump’s State of the Union loomed through Wednesday’s US session and likely kept some traders sidelined, and the broader risk environment — with tariff uncertainty, US-Iran tensions, and the tech sector wobble — prevented a smooth, sustained climb. AUD/USD gave back a portion of its gains through Thursday and Friday as those exogenous factors reasserted themselves, closing the week around .7121. Still, for those watching the .7060–.7070 area around the CPI release, the setup offered a window with meaningful follow-through before the reversal. Quicker exits ahead of Trump’s SOTU or Thursday’s risk-aversion wave would have maximized the outcome.
Promotion: Lux Trading Firm funds with real capital (up to $10M in buying power), refunds evaluation fee 100% after Stage 1. Instant funding plans are available. Get a certified track record, and a potential salary for long-term focused, highly qualified performers.
Learn More at Lux Trading Firm
Disclosure: To help support our free daily content, we may earn a commission from our partners if you sign up through our links, at no extra cost to you.
Not Eligible to Move Beyond Watchlist – EUR/AUD & Bearish AUD Setups
EUR/AUD: Bullish AUD Event Outcome + Risk-Off Scenario
EUR/AUD 1-hour Forex Chart Faster with TradingView
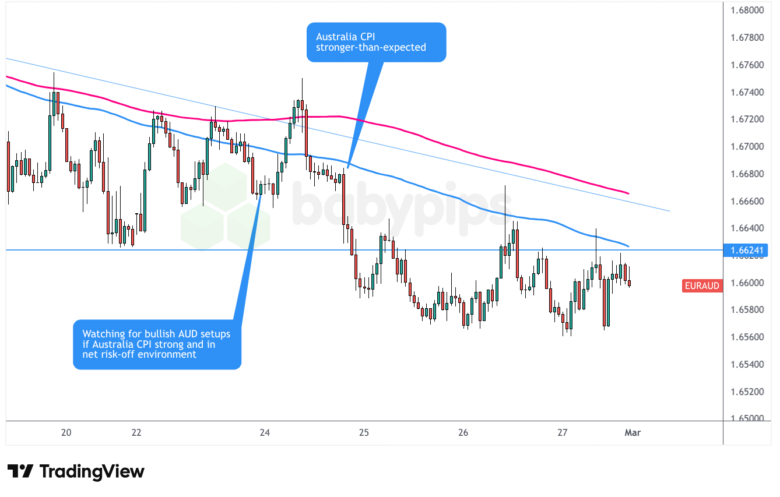
The EUR/AUD watchlist proposed that a hawkish CPI, even in a risk-cautious environment, could crack the 1.6630 descending triangle base and extend the pair’s February slide toward 1.6600 and S1 at 1.6567. The setup was the logical complement to AUD/USD — EUR/AUD captured the scenario where AUD strength combined with ongoing EU trade uncertainty to push the pair lower regardless of whether broader risk sentiment cooperated.
Pre-event, EUR/AUD had already rolled over from the descending trend line near 1.6700/moving averages and was consolidating just above the 1.6680 base, broadly consistent with the picture the watchlist described. The tariff and trade tension backdrop — the EU’s decision to freeze ratification of its US trade deal — was simultaneously applying pressure to the euro, arguably setting up a double tailwind for the bearish EUR/AUD thesis.
The CPI release delivered the fundamental catalyst. EUR/AUD broke below the 1.6630 area in the hours following the print, with selling extending toward the 1.6600 handle and the S1 zone near 1.6567. The technical level broke, and the direction was correct. However, the pair’s movement was similarly messy as with AUD/USD’s. Periodic euro resilience — tied to Germany’s Ifo beat early in the week, EU commission comments on expecting the US to honor the August 2025 trade deal, and France’s constructive CPI print on Friday — created temporary counter-rallies that tested the short thesis at several points. The pair ultimately closed the week around 1.6600, which reflects the directional bias playing out but with significant intra-week whipsawing that would have tested risk management discipline. The setup worked, but it demanded more patience than the cleaner AUD/USD trade.
AUD/NZD: Bearish AUD Event Outcome + Risk-On Scenario
AUD/NZD 1-hour Forex Chart Faster with TradingView
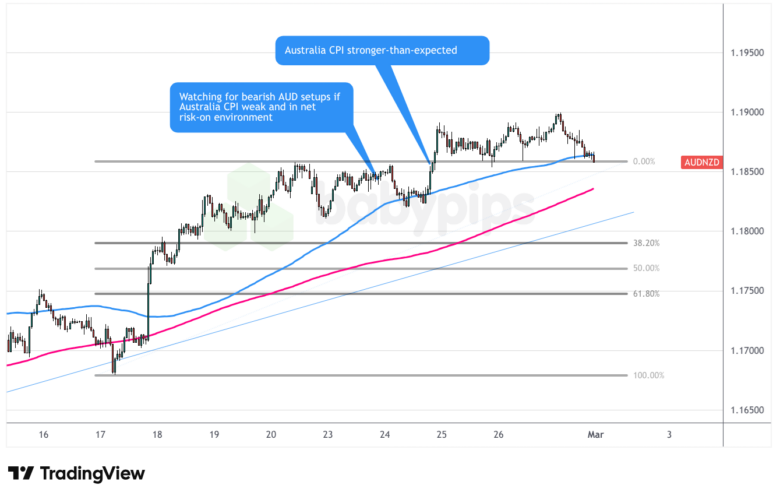
The AUD/NZD watchlist was constructed for the opposite outcome — a CPI miss that would cool RBA rate hike expectations and put pressure on the pair’s ascending trend line support. The levels flagged for a potential pullback were the 38.2% Fib and Pivot Point near 1.1800, the 50% level aligning with the 200 SMA, and the 61.8% Fib approaching S1 at 1.1740.
The Australian CPI outcome was AUD-bullish, not AUD-bearish — the exact opposite of what this setup required, therefore preventing AUD/NZD to move beyond the watchlist stage. Still let’s take a quick look to see how the pair behaved this week.
Rather than pulling back to the flagged support zones, AUD/NZD spiked higher following the CPI release, reaching toward the recent resistance near 1.1858 before consolidating. It never offered the entry conditions the watchlist had described. Gains against the Kiwi were the most modest of AUD’s post-CPI advances (only +0.19% initially), suggesting some NZD sympathy from the risk environment, but the direction was still the wrong way for this setup. There was no premise for acting on the AUD/NZD bearish watchlist this week.
AUD/JPY: Bearish AUD Event Outcome + Risk-Off Scenario
AUD/JPY 1-hour Forex Chart Faster with TradingView
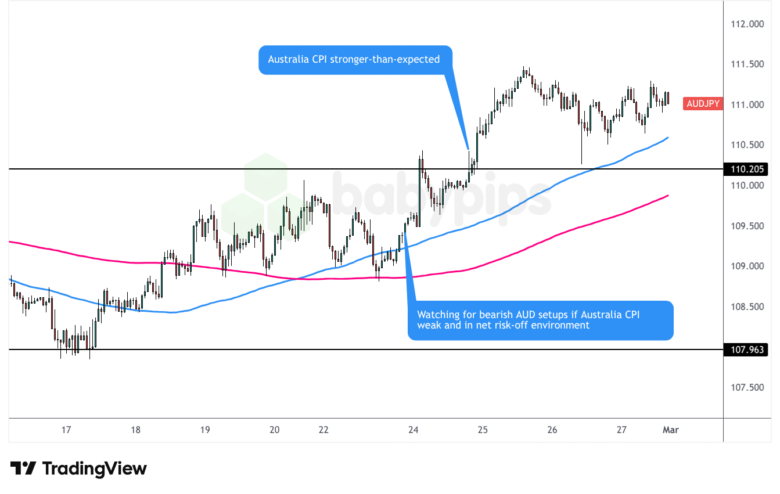
The AUD/JPY watchlist was designed for a CPI miss combined with risk-off conditions — a scenario where AUD weakness and yen safe-haven demand could push the pair from the smaller range support near 109.00 toward the larger range floor at 108.00, or trigger a reversal from resistance near 110.00 if the pair had advanced ahead of the data.
Again, the CPI was hawkish, not a miss, invalidating a move beyond the watchlist stage. But let’s briefly review its behavior to see what we can learn.
AUD/JPY surged following the hawkish Australia CPI print, clearing the 110.00 range resistance that the watchlist had flagged as a potential reversal zone and extending into the 111.00+ area. The BOJ political developments added further complexity — yen weakness through Tuesday and Wednesday on reports of political pressure against further BOJ hikes amplified the rally, before Takata’s hawkish Thursday remarks triggered a sharp pullback. Ultimately, AUD/JPY closed the week around 111.00, comfortably above the levels the bearish watchlist was monitoring.
The Verdict
The January Australian CPI report delivered precisely the kind of hawkish surprise that the bullish AUD watchlist was built for. The trimmed mean climbing to 3.4% year-over-year — its highest since October 2024 — was arguably the more significant number than the headline beat, confirming that underlying inflation isn’t simply a function of one-off energy distortions. That distinction mattered for market durability: the AUD reaction held through multiple sessions rather than fading immediately, reflecting genuine repricing of RBA forward expectations rather than a knee-jerk move.
For AUD/USD specifically, the setup arguably represented the week’s highest-quality combination of fundamental clarity and technical precision. The pair was at the right level when the data landed, the reaction was directionally clean, and the immediate post-CPI window offered a measurable opportunity before exogenous factors (the State of the Union, Iran tensions, the tech selloff) introduced noise. EUR/AUD captured the hawkish AUD thesis in a risk-off wrapper and worked directionally, but arguably required more active management given the euro’s periodic counter-rallies on EU-US trade headline developments. The two bearish AUD setups — AUD/NZD and AUD/JPY — were simply on the wrong side of the data and were correctly left on the shelf.
Overall, we’d rate last week’s Watchlist exercises as arguably “highly likely” of supporting a potential net positive outcome, given that the Australian dollar rallied after the clear bullish fundamental signal as expected, and AUD rarely spent any time negative against the majors relative to pre-event prices.
Key Takeaways:
Core Inflation Is the Number Within the Number The headline CPI figure matched the prior month’s annual rate and beat modestly on the monthly reading — but it was the trimmed mean’s move to 3.4% that did the real work in repricing RBA expectations. Events where the core or underlying measure diverges meaningfully from the headline oftentimes produce more durable follow-through because they signal demand-driven rather than distortion-driven inflation. When reviewing future CPI watchlists, give the underlying measures equal or greater weight in assessing the fundamental premise.
Exogenous Risk Can Narrow the Window, Not Eliminate the Setup The post-CPI AUD/USD opportunity existed, but it was compressed by the surrounding noise — the State of the Union, BOJ political developments, and US-Iran tensions all worked to cap the move or reverse it faster than a clean-environment trade would have allowed. The setup was valid; the holding period had to be shorter than it might otherwise have been. When multiple high-impact events are clustered in the same window, the logical response is to target the nearest technical objective first and treat additional gains as a secondary consideration rather than an assumption.
Having Both Sides Prepared Is Worth the Extra Work Publishing two watchlists ahead of the CPI — one for a hawkish outcome (AUD/USD and EUR/AUD) and one for a dovish miss (AUD/NZD and AUD/JPY) — meant that when the data landed, the framework for acting was already in place regardless of which way inflation broke. The bearish AUD setups required no action once the beat was confirmed, but the discipline of having them defined in advance is what allows for faster decision-making in the immediate post-event window. A prepared thesis executed imperfectly still tends to outperform an improvised one.
Promoted: The Strategy is Half the Battle; Your Mindset is the Rest.
Most trading mistakes aren’t technical—they’re psychological. In the classic “Trading in the Zone” by Mark Douglas (⭐ 4.7★ | 10,000+ reviews on Amazon), you’ll learn how to master the probabilistic thinking and emotional discipline mentioned in today’s article. If you struggle with hesitation or breaking your rules, this is your manual for consistent execution.
Click on the link to learn more about “Trading in the Zone” by Mark Douglas!
Disclosure: To help support our content, we may earn a commission from our partners if you sign up through our links, at no extra cost to you.