


Australia released stronger-than-expected inflation data, as the headline annual CPI reading jumped to 3.2% and surpassed its central bank’s 2-3% target range.
How did the Australian dollar react, and which among our watchlist setups yielded the best trading opportunity?
Watchlists are price outlook & strategy discussions supported by both fundamental & technical analysis, a crucial step towards creating a high quality discretionary trade idea before working on a risk & trade management plan.
If you’d like to follow our “Watchlist” picks right when they are published throughout the week, check out our BabyPips Premium subscribe page to learn more!
We’re breaking down our AUD setups this week and how each pair performed after hotter-than-expected Australian CPI data while markets remained mostly focused on trade headlines.
The Setup
What We Were Watching: Australian Consumer Price Index (Q3 2025)
- Expectation: Headline CPI to rise from 0.7% to 1.0% q/q or from 2.1% to 2.9% y/y in the September quarter
- Data outcome: Headline CPI surged to 1.3% q/q or 3.2% y/y, above the RBA’s 2-3% target range
- Market environment surrounding the event: Mixed sentiment and risk correlations, as asset classes were driven by trade optimism ahead of the Trump-Xi meeting, U.S. tech sector rally, central bank positioning, and resurfacing geopolitical tensions in Israel
Event Outcome
Australia’s CPI rose 3.2% year-over-year in the third quarter of 2025, marking the highest inflation rate in over a year and landing above the Reserve Bank of Australia’s target band for the first time since Q2 2024.
Key Takeaways:
- Headline CPI increased 3.2% annually in Q3 2025, significantly above the 3.0% consensus forecast and accelerating from 2.1% in Q2
- Quarterly inflation rose 1.3%, driven primarily by housing (+2.5%), recreation and culture (+1.9%), and transport (+1.2%)
- Trimmed mean inflation climbed to 3.0% annually, up from 2.7% in Q2 – the first increase since December 2022
The most significant price rises in Q3 were concentrated in housing, recreation and culture, and transport sectors. Property rates and charges also recorded their largest quarterly rise since 2014, increasing 6.3% as local councils implemented rate reviews.
Fundamental Bias Triggered: Bullish AUD setups
Broad Market and Exogenous Drivers:
Trade Optimism and Risk-On Rally (Monday-Tuesday): Markets surged as weekend developments revealed a U.S.-China diplomatic framework ahead of Thursday’s Trump-Xi summit. The prospect of trade de-escalation sparked a broad risk-on rally, sending equities to fresh highs while gold dipped below $4,000. The ongoing U.S. government shutdown continued depriving markets of critical economic data.
Central Bank Volatility and Powell’s Hawkish Pivot (Wednesday): The Fed delivered an expected 25 basis point cut, but Chair Powell shocked markets by stating December cuts weren’t a “foregone conclusion.” This triggered a sharp dollar rally and sent 10-year yields spiking to 4.10%. The Bank of Canada also cut rates but signaled its easing cycle may be over, while Australia’s hot CPI all but ruled out a November RBA cut.
Trade Truce and Central Bank Surprises (Thursday-Friday): U.S. President Trump boasted that the meeting with Chinese President Xi was “incredible” and boasted of the tariffs truce that temporarily de-escalated trade tensions. Volatility remained elevated in the forex scene, as the BOJ downplayed its hawkish tilt and cited the need to wait for more data before tightening. Meanwhile, the ECB also kept rates unchanged but paid extra close attention to external risks from trade and geopolitics that could alter its policy path.
AUD/NZD: Bullish Event Outcome + Risk-Off Scenario
= Arguably good odds of a net positive outcome
AUD/NZD 1-Hour Forex Chart by TradingView
This setup focused on a long bias and likely delivered exceptionally well throughout the week. After the original discussion, AUD/NZD broke above its October trend line resistance ahead of the CPI release and was hovering near the 1.1400 psychological level and R2 Pivot Point at 1.1394 when the Australian inflation data hit the wires.
The hotter-than-expected CPI print sparked an immediate validation of fundamental Aussie long bias, confirmed by AUD/NZD’s move to break above R2 immediately. After a quick consolidation & pullback, the pair retested the R2 Pivot Point resistance-turned-support before climbing to new weekly highs as the fundamental sentiment favored Aussie over the Kiwi.
The bullish move before the end of the week was likely fueled by a clear fundamental gap between the two currencies. Australia’s inflation surprise kept the RBA leaning cautious on rate cuts, while New Zealand’s weak data, including the ANZ Roy Morgan confidence drop to 92.4, added some pressure on Kiwi. Even with Powell’s hawkish FOMC tone shaking risk sentiment midweek, the pair held firm at key support before pushing higher again.
Because of the pullback, some trade management factors an individual would have made would have likely influenced the degree of a trade outcome, but because AUD/NZD closed the week above the discussion price area and post event price area, this discussion would highly likely have generated a net positive outcome for most trade strategies.
Not Eligible to move beyond Watchlist – Bearish AUD Setups and AUD/USD
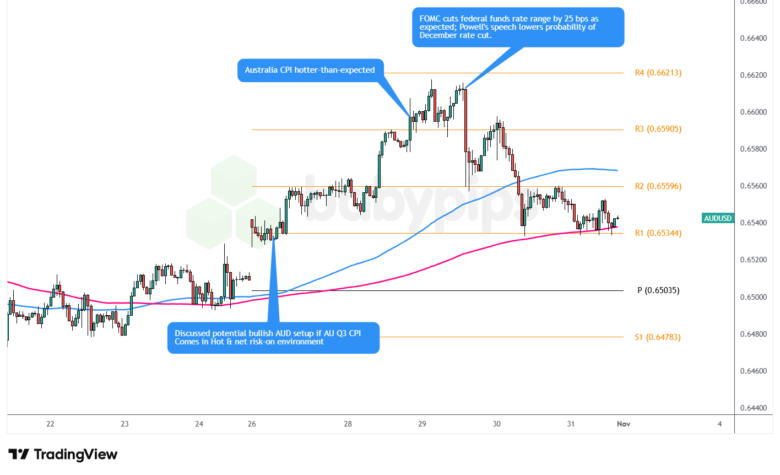
AUD/USD: Bullish AUD Event Outcome + Risk-On Scenario
AUD/USD 1-Hour Forex Chart by TradingView
AUD/USD started the week strong, breaking above the .6525 triangle resistance ahead of the CPI release. The hotter inflation print sparked a quick rally, with the Aussie gaining broadly, especially against GBP and NZD.
But Powell’s hawkish FOMC tone midweek flipped USD sentiment mid-week, pushing the dollar higher, which in our opinion, effectively weakened our conviction or invalidated being long biased on AUD/USD.
That FOMC event promptly had AUD/USD Forex traders back in sell mode, forcing the pair to give back much of its post-CPI pop. For anyone who ignored USD fundamental developments and tried to long AUD/USD likely saw a very negative outcome by the end of the week, no matter what trading style / strategy may have been deployed.
AUD/CAD: Bearish Event Outcome + Risk-On Environment
AUD/CAD 1-Hour Forex Chart by TradingView
The outcome of the target event did not favor bearish AUD setups, as Australia’s CPI surged above expectations and the RBA’s target range. The outcome plus the bullish sentiment in the pair before the event invalidated the AUD/CAD discussion, making it unsuitable to move beyond the watchlist phase.
Post Australian CPI event, the Loonie actually benefited from a rebound in crude oil prices spurred by resurfacing Russian geopolitical tensions and U.S. sanctions. Combined with somewhat less dovish commentary from the BOC mid-week, this is likely why AUD/CAD pulled back lower and the pair fell into a consolidation pattern, as bulls from both sides butted heads in the pair for the rest of the week.
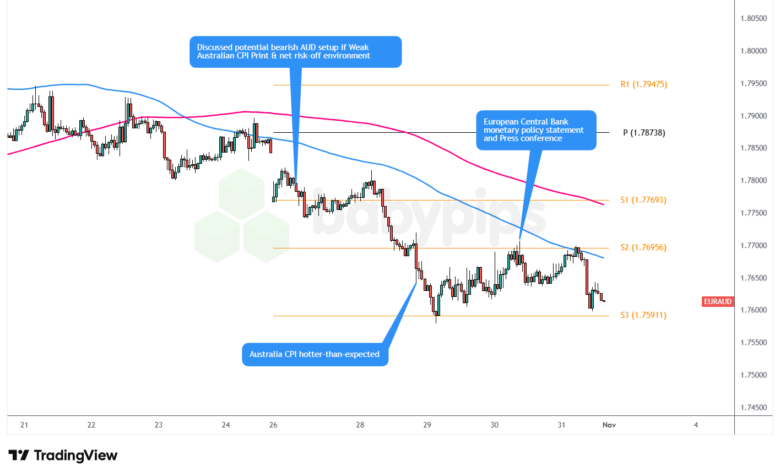
EUR/AUD: Bearish Event Outcome + Risk-Off Environment
EUR/AUD 1-Hour Forex Chart by TradingView
This setup assumed weaker Australian inflation would trigger AUD selling, positioning EUR/AUD for a bounce from the middle of its long-term range. The hotter-than-expected CPI invalidated this thesis from the outset.
While risk-off flows did periodically support safe-haven currencies like EUR during mid-week volatility following Powell’s hawkish tone, the fundamental case for AUD strength overwhelmed these temporary shifts. EUR/AUD remained under pressure throughout the week as the inflation surprise reinforced expectations for continued RBA caution on potential rate cuts, and as the euro saw a bit of weakness as the U.S. dollar found strength in the latter half of the week.
The Verdict
Australia’s upside inflation surprise strongly supported bullish AUD opportunities, with AUD/NZD moving beyond the Watchlist phase as a viable candidate for live risk exposure. The hotter-than-expected CPI reading—which pushed headline inflation to 3.2% y/y and above the RBA’s target range—reinforced the case for extended policy caution from the central bank.
The AUD/NZD long bias emerged as a likely winner as well. The pair’s upside was confirmed immediately following the CPI release, and possibly drew in fundamental bulls, specifically after the retest of the broken Pivot resistance levels. The fundamental divergence between sticky Australian inflation and softer New Zealand data support a compelling fundamental narrative that proved resilient even when broader risk sentiment shifted mid-week.
Overall we rate our watchlist discussions as “highly likely” supportive of a positive outcome since the bullish AUD bias combined with a complex yet slightly risk-off market environment surrounding the target event enabled AUD/NZD to capitalize on the stronger than expected CPI results.
Key Takeaways:
Fundamental Divergence Beats Risk Sentiment
Even as risk appetite shifted midweek after Powell’s hawkish tone, AUD/NZD kept rallying thanks to Australia’s sticky inflation and New Zealand’s weak data. Strong fundamentals outweighed shifting market mood.Application: When trading event-driven crosses, focus on fundamental divergence. Solid macro stories endure; sentiment-driven pairs often don’t.
Manage Timing Around Major Events
The CPI release landed right before central bank meetings/statements and important trade events, creating a catalyst-packed week that demanded tighter risk control.
Application: When multiple events crowd the calendar, plan exits and risk trims early. Active management between catalysts can mean the difference between profit and drawdown.
Technical and Fundamental Alignment Boosts Conviction
AUD/NZD had already broken its trend line before the CPI release, and the inflation beat confirmed the setup.
Application: Favor setups where technicals and fundamentals align. When price action supports your bias ahead of an event, momentum usually lasts longer and risk-reward improves.
Disclaimer: The forex analysis content provided in Babypips.com is intended solely for informational purposes only. The technical and fundamental scenarios discussed are presented to highlight and educate on how to spot potential market opportunities that may warrant further independent research and due diligence. This content shows how we cover a portion of the full trading process, and does not constitute that we ever give specific investment or trading advice. The setups and analyses presented on Babypips.com are very likely not suitable for all portfolios or trading styles.
Trade and risk management are the sole responsibility of each individual trader. All trading decisions and their subsequent outcomes are the exclusive responsibility of the individual making them. Please trade responsibly.
Trading responsibly means knowing as much as you can about a market before you think about taking on risk, and if you think this kind of content can help you with that, check out our BabyPips Premium subscribe page to learn more!