Australia’s CPI reading fell short of estimates in November, as annual inflation slowed from 3.8% to 3.4% and briefly revived dovish RBA expectations.
Which AUD strategies moved beyond the watchlist stage, and how did shifting overall market sentiment impact the outcomes?
Watchlists are price outlook & strategy discussions supported by both fundamental & technical analysis, a crucial step towards creating a high-quality discretionary trade idea before working on a risk & trade management plan.
If you’d like to follow our “Watchlist” picks right when they are published throughout the week, check out our BabyPips Premium subscribe page to learn more!
We’re breaking down our Australian dollar setups this week and examining how each pair performed after the Australian CPI miss while markets stayed cautious amid other major market drivers.
The Setup
What We Were Watching: Australian CPI (November 2025)
- Expectation: Headline CPI to hold steady at 3.8% year-on-year
- Data outcome: Annual inflation slowed from 3.8% to 3.4%, monthly print came in flat vs. expected 0.1% uptick
- Market environment surrounding the event: Slight risk rebound but still some degree of caution surrounding Venezuela crisis, resurfacing China-Japan tensions, and U.S. data focus
Event Outcome
Headline CPI slowed from 3.8% year-on-year in October to just 3.4% in November, as both goods and services inflation moderated. Trimmed mean inflation also eased, although housing costs continued to exert strong upward pressure.
Key Takeaways:
- Headline CPI rose 3.4% year-over-year in November, down from 3.8% in October and marking the lowest reading since mid-2024
- Trimmed mean inflation (core measure) eased to 3.2% annually from 3.3%, the lowest since December 2021
- Monthly CPI was flat (0.0%) in original terms but rose 0.2% on a seasonally adjusted basis
- Housing costs remained the largest contributor to inflation at 5.2% annually, driven primarily by electricity and rents
- Electricity prices surged 19.7% annually as Queensland state rebates were exhausted, though the pace moderated from October’s 37.1% increase
- Services inflation eased to 3.6% from 3.9%, while goods inflation slowed to 3.3% from 3.8%
AUD initially had a bearish reaction to the weaker-than-expected headline figures, as traders probably considered a potential switch back to a more dovish RBA stance.
However, the currency quickly stabilized within minutes after the release and eventually reversed higher likely on account of persistently elevated services inflation above the central bank’s comfort zone.
Fundamental Bias Triggered: Bullish AUD setups
Broad Market and Exogenous Drivers:
Venezuela Tension Escalation (Monday): Traders greeted the first trading week of the year with a fresh round of geopolitical tensions, stemming from news of the U.S. capture of Venezuela’s President Maduro, which then prompted international outcry. Safe-haven flows further picked up on weak eurozone mid-tier data, before frowns turned upside down before the day ended as traders judged that the fallout from Venezuela would be limited.
Global Economic Data Focus (Tuesday-Wednesday): Market players then turned their attention to leading U.S. jobs indicators ahead of the NFP release later in the week, with data points (ISM services PMI, initial jobless claims) coming in net positive. Some green shoots in German factory orders data also helped markets stayed cheery midweek, along with sticky inflation data from Australia that ultimately supported hawkish RBA expectations.
Dollar Domination (Thursday-Friday): Price action leaned strongly in favor of the U.S. dollar during the back half of the week, as the European slowdown narrative gained further traction on not-so-impressive data from the U.K. and Switzerland while traders positioned for a potential upside NFP surprise. Resurfacing China-Japan tensions also did not do higher-yielding and Asian currencies much favors either.
Even though the NFP numbers turned out mixed, markets interpreted the results to be broadly supportive a more hawkish Fed, as underlying components and other mid-tier reports supported the U.S. economic recovery story. Weakness in Japan’s average cash earnings report also rendered the dollar as the preferred safe-haven currency by week’s end, while speculations of increased Chinese stimulus to combat deflation brought brief inflows to commodity currencies.
AUD/JPY: Bullish Event Outcome + Risk-On Scenario = Arguably good odds of a net positive outcome
AUD/JPY 1-hour Forex Chart by TradingView
Our watchlist setup eyed a potential long AUD/JPY opportunity should the Australian CPI release come in above expectations. Although the headline results fell short of estimates, there was a solid case for further AUD upside as core inflation remained sticky at 3.2%, which is still above the central bank’s 2-3% comfort zone.
After the brief dip following the release, Aussie traders also took note of how the readings were dragged lower by one-off electricity price fluctuations after rebates instead of broad-based cooling price pressures. With that, AUD quickly got back on its feet and ripped higher while markets continued to expect a 39% probability of a February RBA rate hike despite the CPI miss.
These allowed AUD/JPY to move beyond the watchlist stage, thanks to the combination of a rebound in risk-taking following the initial Monday dip from Venezuela geopolitical tensions. AUD/JPY managed to extend its post-CPI run to R2 (105.79) before a bearish candlestick formed to suggest potential profit-taking at the resistance level.
The spotlight shifting to U.S. data points and potential upside NFP surprise triggered some risk-off flows that weighed on AUD midweek, though, before a fresh wave of yen weakness came in play on account of weak Japanese services PMI and average cash earnings allowed the pivot point (104.86) to hold as support. This lifted AUD/JPY back above the 105.00 handle then as high as around 105.60 before the week closed, along with the possibility of increased Chinese stimulus following a mixed CPI print.
Not Eligible to move beyond Watchlist – AUD/NZD & Bearish AUD Setups
AUD/NZD: Bullish Event Outcome + Risk-Off Scenario
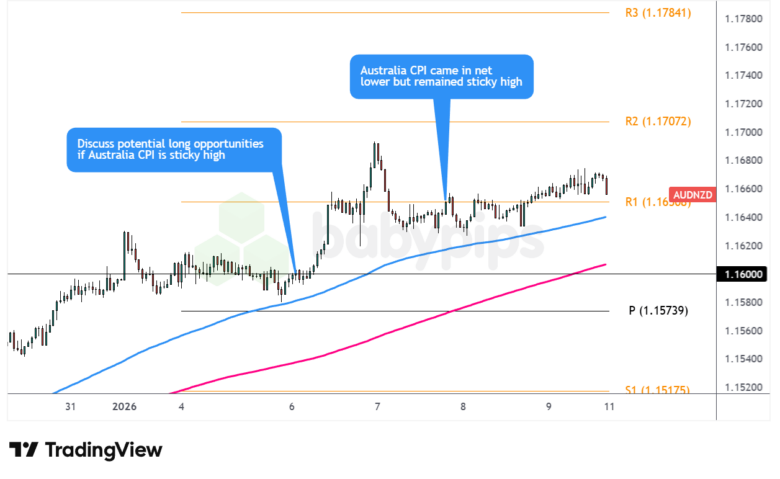
AUD/NZD 1-hour Forex Chart by TradingView
Our analysts eyed a possible trend line bounce on AUD/NZD, as the pair appeared ready to reestablish support around the 1.1600 zone in a risk-off setting that tends to favor the Aussie over the Kiwi. The pair gained traction in its ongoing uptrend even before the CPI release, pushing the price to nearly test the 1.1700 handle as some risk-off flows likely weighed more heavily on the Kiwi early in the week.
Although the surface-level CPI results fell below estimates, underlying data revealed sticky core inflation that was enough to keep hawkish RBA expectations anchored. As a result, AUD/NZD fought to hold steady around R1 in the sessions that followed, even as strengthening hawkish Fed expectations continued to dampen risk-taking midweek.
However, the tug-o-war of risk flows between the Aussie and Kiwi for the most part of the week prevented this pair from moving beyond the watchlist stage, as neither currency was able to flex its muscles long enough to emerge as the preferred risk currency amid shifting sentiment.
AUD/NZD eventually broke above consolidation and R1 towards the end of the week, partly driven by downbeat Chinese inflation data spurring expectations of additional stimulus that could prove beneficial for the Australian economy, but gains were muted.
GBP/AUD: Bearish Event Outcome + Risk-On Scenario
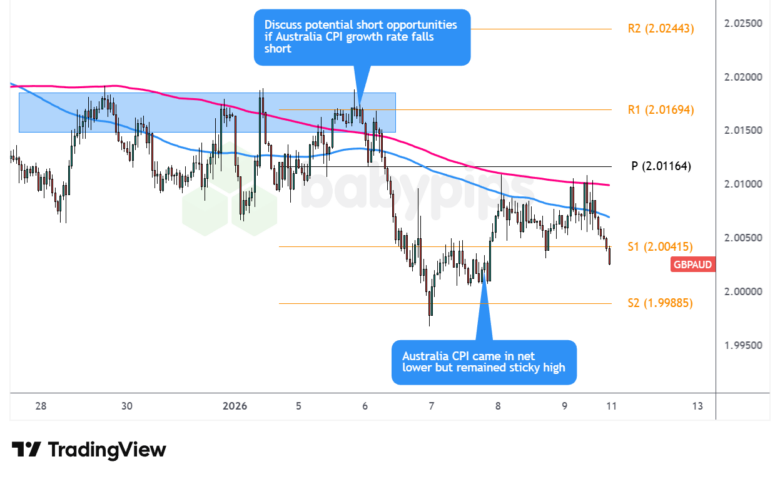
GBP/AUD 1-hour Forex Chart by TradingView
Our analysts expected a cooler-than-anticipated Australian CPI print to fuel dovish Reserve Bank of Australia speculation. When combined with the British pound, which recently found support from the Bank of England’s recent “hawkish cut” event, GBP/AUD bounced above what appeared to be a Triple Bottom pattern on the 1-hour time frame.
While Australia’s headline CPI did come in cooler for November, markets zeroed in on underlying price pressures that stayed hawkish. That was enough to send AUD sharply higher and invalidate our GBP/AUD bullish setup before it could move beyond the watchlist stage.
GBP/AUD bottomed near 1.9980 before concerns over China-Japan tensions and a pullback in gold prices took some shine off the Aussie against the pound. The pair then ground higher in the second half of the week, closing near 2.1000 but still below the Triple Bottom neckline we had flagged.
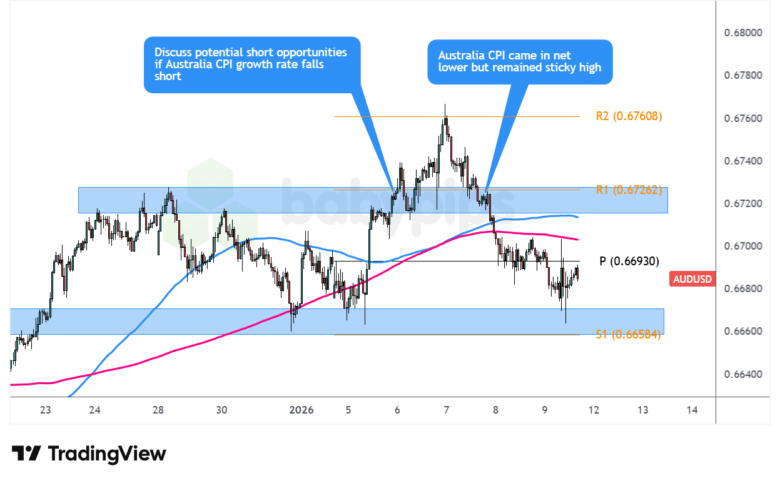
AUD/USD: Bearish Event Outcome + Risk-Off Scenario
AUD/USD 1-hour Forex Chart by TradingView
AUD/USD had been tossing and turning inside a range between S1 at .6660 and R1 at .6730 through the latter half of December, repeatedly testing resistance just ahead of the Australian CPI release.
Our watchlist setup was looking for a potential reversal off the ceiling back toward support if the inflation numbers came in soft. Instead, the U.S. dollar’s early week weakness & net positive Chinese PMIs, pushed AUD/USD above its identified range and knocked the setup out before it could move beyond the watchlist stage.
AUD/USD went on to tag the .6761 R2 Pivot Point resistance before a U.S. dollar recovery after better-than-expected U.S. services PMIs dragged the pair back lower, not only back inside the range but also to test the range support as the Dollar dominated the rest of the week.
The Verdict
The Australian CPI release came in below expectations, but it didn’t seem enough to materially revive dovish RBA expectations since market watchers focused on elevated services inflation that supported the hawkish central bank narrative.
As a result, the currency’s initial dip proved to be short-lived since it eventually regained ground on reinforced speculations that the RBA could refrain from cutting interest rates early this year. This reaction, combined with
While the initial market reaction to the CPI report triggered an AUD dip, the currency quickly found its footing as traders digested the one-off price effects and how the numbers ultimately kept RBA tightening expectations anchored. Sentiment also leaned in favor of a risk rebound, as traders judged that the Venezuelan fallout would be limited while the spotlight soon shifted to net positive U.S. jobs data.
AUD/JPY was our primary candidate to move beyond the watchlist stage, given the overall bullish reaction to the Australian inflation report and hawkish RBA speculations, as well as some risk-on undertones surrounding the target event, especially as the situation between Venezuela and the U.S. did not escalate further militarily.
Although some risk-off vibes picked up towards the latter part of the week on account of reinforced Fed tightening expectations, the pair was also able to benefit from yen selling on dollar inflows and weak Japanese mid-tier data that cast doubts on the hawkish BOJ stance.
Overall, we rate the watchlist discussion as “neutral-to-likely supportive” of a potential positive outcome. The weaker than expected outcome did not spark a straightforward extended bearish AUD reaction and instead triggered a run higher, putting AUD/JPY in a good position to take advantage of further gains, although risk management and stop placement would have played a crucial role in possible outcomes as the pair dipped below pre-CPI levels before recovering later in the week.
For instance, short-term traders who were able to catch the brief AUD dip immediately after the CPI report was printed could have caught the intraday rally from R1 to R2 before booking profits on the formation of a reversal candlestick.
Meanwhile, longer-term traders who saw the extended rally pre-event and waiting to for a pullback opportunity to the resistance-turned-support zone or rising trend line could have caught the latter rally back to R1 and possibly wound up with better return-on-risk.
Key Takeaways:
Price Reactions Aren’t Always Straightforward
Stronger than expected data don’t always result to bullish currency movements and, in this particular case, downbeat figures don’t guarantee bearish outcomes either. Given the persistently hawkish RBA narrative, traders were more discerning of underlying data and one-off factors that continued to support the tightening bias that fueled sustained AUD upside despite the headline miss.
Stop Placement and Entry Timing Are Crucial
Our viable AUD/JPY watchlist setup highlights how risk management decisions would have played a decisive role in determining whether or not a long position would have turned out profitable.
In this case, sticking to a short-term strategy of buying the dip and booking profits on signs of a potential reversal based on technicals and market sentiment would have bagged quick pips, but keeping the trade open for much longer would have likely erased gains. Sticking to swing opportunities based on pullbacks and central bank divergences would have also played out well, but this likely required more patience and either lower or wider stops that impact return-on-risk.
Disclaimer: The forex analysis content provided in Babypips.com is intended solely for informational purposes only. The technical and fundamental scenarios discussed are presented to highlight and educate on how to spot potential market opportunities that may warrant further independent research and due diligence. This content shows how we cover a portion of the full trading process, and does not constitute that we ever give specific investment or trading advice. The setups and analyses presented on Babypips.com are very likely not suitable for all portfolios or trading styles.
Trade and risk management are the sole responsibility of each individual trader. All trading decisions and their subsequent outcomes are the exclusive responsibility of the individual making them. Please trade responsibly.
Trading responsibly means knowing as much as you can about a market before you think about taking on risk, and if you think this kind of content can help you with that, check out our BabyPips Premium subscribe page to learn more!