
Joblessness in New Zealand hit a nine-year high in Q3 2025, prompting markets to price in stronger odds of another RBNZ rate cut.
How did our watchlist ideas fare this week, and which of the NZD setups worked best with the ongoing market sentiment?
Watchlists are price outlook & strategy discussions supported by both fundamental & technical analysis, a crucial step towards creating a high-quality discretionary trade idea before working on a risk & trade management plan.
If you’d like to follow our “Watchlist” picks right when they are published throughout the week, check out our BabyPips Premium subscribe page to learn more!
We’re breaking down our NZD setups this week and how each pair performed after weaker-than-expected New Zealand jobs data, while sentiment flipped on trade headlines and monetary policy developments.
The Setup
What We Were Watching: New Zealand Employment Report (Q3 2025)
- Expectation: Quarterly employment change to rebound 0.1% after previous 0.1% dip
- Data outcome: Employment change was flat in Q3, while the jobless rate rose from 5.2% to 5.3% as expected
- Market environment surrounding the event: Mild risk-taking thanks to the U.S. and China following through on their tariffs truce, plus renewed Fed December cut expectations on weak underlying U.S. jobs data
Event Outcome
New Zealand reported a flat employment change figure for Q3 2025, effectively bringing the jobless rate up to its nine-year high of 5.3%. The labor force participation rate dipped from 70.5% to 70.3% to reflect dwindling confidence in the job market.
Key Takeaways:
- Unemployment rate: 5.3%, up from 5.2% in Q2 (matched economist forecasts)
- Employment change: 0.0% for the quarter (slightly below the 0.1% increase expected)
- Participation rate: 70.3%, down from 70.5% in Q2
- Total unemployed: 160,000 people, including 22,700 who have been out of work for more than a year
- Wage growth (private sector): Up 0.5% for the quarter and 2.1% annually
The flat employment growth means the working-age population increase of 0.3% was absorbed through higher unemployment and lower labor force participation. In addition, hours worked actually increased 0.9% in the quarter, suggesting that employers might be asking existing workers to take on more hours rather than hiring new staff.
Fundamental Bias Triggered: Bearish NZD setups
Broad Market and Exogenous Drivers:
FOMC spillover and equity meltdown (Monday-Tuesday): The lack of major catalysts early in the week left traders still reacting to the aftermath of the relatively hawkish FOMC event, sparking mild risk-off flows on lower expectations of a December cut. It didn’t help that major economies reported mostly downbeat final manufacturing PMI figures and that concerns about U.S. equity valuations picked up, enabling risk aversion to extend its stay until the next trading sessions.
Risk turnaround on trade progress (Wednesday): Markets were in a much better mood midweek, following Trump’s formal decision to cut China’s fentanyl tariffs and Beijing’s announcement about suspending 24% tariffs on U.S. goods. In addition, the U.S. Supreme Court’s hearings on the legality of Trump’s tariffs allowed safe-havens to retreat.
Mixed U.S. jobs and policy signals, then shutdown relief (Thursday-Friday): Traders dissected the latest jobs releases pretty closely to get a better handle on the U.S. labor market situation in the absence of official government data. So far, the ADP report, ISM services PMI and Challenger job cuts were mostly pointing to hiring weakness in October, stoking expectations of a December rate cut.
However, a number of FOMC officials expressed caution about further easing, underscoring Fed head Powell’s less dovish remarks in the previous week. Disappointing trade figures from China kept risk-taking in check through much of Thursday and early Friday. The mood shifted late Friday as reports emerged that U.S. lawmakers were nearing a deal to avert the government shutdown, contributing to a recovery in risk appetite that helped equities pare earlier losses and supported a firmer tone across broader risk assets heading into the weekend.
GBP/NZD: Bearish Event Outcome + Risk-On Scenario = Arguably good odds of a net positive outcome
GBP/NZD 1-hour Forex Chart Chart by TradingView
With this pair already hovering above a near-term descending trend line early in the week, our analysts stayed on the lookout for the potential bullish reversal gaining traction should the New Zealand jobs report disappoint.
Weaker than expected NZ quarterly employment growth and an uptick in the jobless rate triggered GBP/NZD moving beyond the watchlist stage, and kept GBP/NZD afloat as it consolidated above the 200 SMA and 2.0300 major psychological mark midweek. The pair stayed within this short-term range in the next trading sessions while sentiment improved and the Kiwi drew a bit of support from positive trade developments.
Upside momentum prevailed even after the BOE announced a dovish split decision to hold, as that development was overshadowed by broad risk aversion on mixed Fed commentary, weak U.S. jobs indicators, and downbeat Chinese trade figures. These developments translated into further downside for the already weak Kiwi, and from there, GBP/NZD took out one resistance level after another, surging past R1 (2.3141) then R2 (2.3336) before topping out around the 2.3400 major psychological resistance.
Not Eligible to move beyond Watchlist – Bullish NZD Setups and NZD/JPY
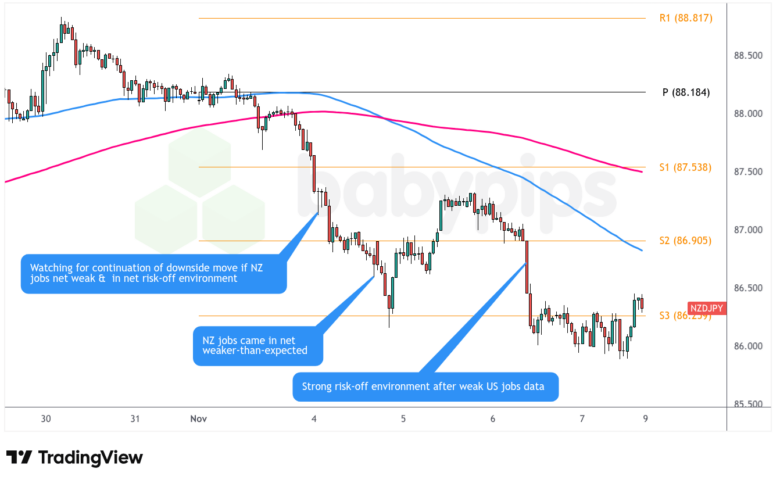
NZD/JPY: Bearish NZD Event Outcome + Risk-Off Scenario
NZD/JPY 1-hour Forex Chart Chart by TradingView
This pair had already bounced off a longer-term ceiling and was starting to fall through a descending trend line visible on the hourly time frame, leading our analysts to note that bearish pressure was starting to pick up ahead of the NZ jobs release.
Further downside was seen when the actual figures came in slightly below expectations, taking NZD/JPY down from S2 (86.90) to S3 (86.23) within a few hours after the release, before market sentiment shifted positive on U.S.-China trade developments. With broad market sentiment leaning risk-on at this point, this pushed NZD/JPY behind GBP/NZD in terms of moving beyond the watchlist.
But in terms of broad market sentiment, as mentioned above, we saw a pretty manic week as risk sentiment quickly turned sour on Thursday after U.S. job cuts data. This took NZD/JPY back to the support zone at S3 as the Kiwi selloff also likely drew in some selling pressure from downbeat Chinese trade data.
Despite not being the top pick for a move beyond the watchlist, NZD/JPY ended up theoretically performing net positive thanks to the Thursday shift in risk sentiment.
AUD/NZD: Bullish NZD Event Outcome + Risk-On Environment
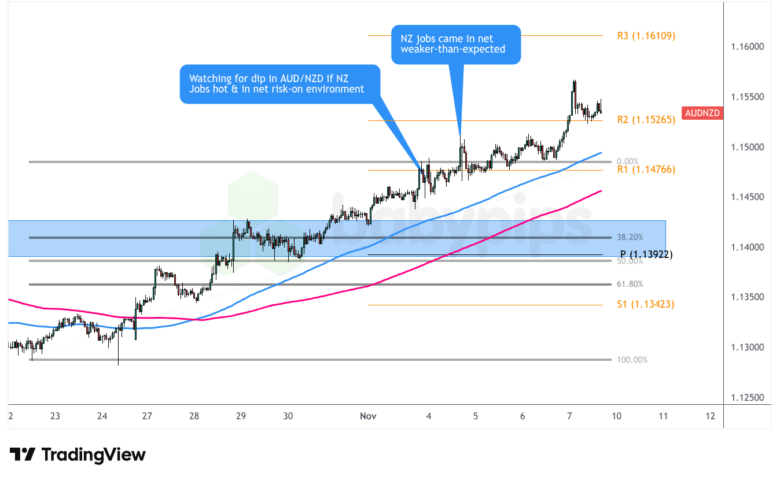
AUD/NZD 1-hour Forex Chart Chart by TradingView
Our watchlist setup for AUD/NZD anticipated a slight decline in case the actual NZ jobs numbers beat estimates, before longer-term fundamentals and monetary policy divergences kick in to reinforce the current trend.
With NZ unemployment jumping to 5.3% and employment growth stuck at 0.0%, the case for NZD strength vanished on impact & disqualified AUD/NZD from moving beyond the watchlist stage. The data triggered a clear bearish reaction, and the pair never even pulled back to the support zone we had been watching.
Instead, it powered straight through the recent highs at R1 (1.1480), boosted by the earlier RBA decision that confirmed a more hawkish stance. In addition, positive trade developments between the U.S. and China kept the Aussie supported above the 1.1500 major psychological mark.
Given the intraweek developments for both currencies, it’s probably no surprise that AUD/NZD was actually one of the best pairs to play the weak NZ Jobs outcome (over 1.5 daily ATR move from event price). This is a great example of how traders should always be flexible with biases and be prepared adapt to the information at hand.
NZD/USD: Bullish NZD Event Outcome + Risk-Off Environment
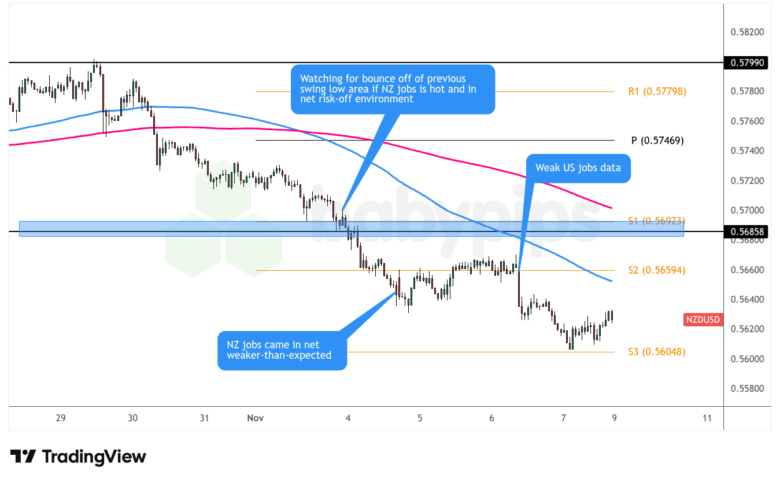
NZD/USD 1-hour Forex Chart Chart by TradingView
If New Zealand’s jobs figures had beaten estimates and traders were feeling risk-averse, we were watching for a possible bounce from NZD/USD’s range support. The pair had already dropped after Powell’s hawkish remarks the previous week, sliding to the 0.5700 floor, which lined up with S1 at 0.5690.
Instead, the actual NZ labor market numbers came in weaker than expected and immediately triggered a breakdown below S1 at 0.5690, quickly invalidating NZD/USD long bias on both a fundamental & technical argument front. NZD/USD barely looked back as it consolidated then continued lower with the help of weak U.S. job cuts data to add risk aversion behavior to the list of drivers sending the pair lower.
The Verdict
New Zealand’s downbeat employment data supported bearish Kiwi opportunities, with GBP/NZD moving beyond the watchlist phase as a viable candidate, thanks to net bullish risk sentiment at the time of release supporting further upside for the pair. The surprise decline in NZ quarterly hiring underscored stronger odds of another RBNZ cut, even outweighing dovish BOE expectations, as data from China also reinforced a pessimistic view.
The pair kept its downside limited even as mild risk-taking came into play midweek, holding its ground above pre-event levels and ultimately breaking higher when risk aversion came back in play later on. Price gained traction on its climb as it busted through one resistance level after another, barely looking back from its rally as risk assets took major hits until the end of the trading week.
Overall, we rate our watchlist discussions as “highly likely” supportive of a potential positive outcome since the bearish NZD bias, combined with some risk-taking surrounding the target event, enabled GBP/NZD to capitalize on the weaker-than-expected jobs report. And given the strong directional move, advanced or complex risk/trade management strategies & execution would not likely have been needed to achieve a net positive outcome.
Key Takeaways:
Multiple Scenarios Can Deliver Positive Outcomes
Even though NZD/JPY wasn’t the top pick for moving beyond the watchlist, it “ended up theoretically performing net positive” when Thursday’s risk sentiment shift aligned with the bearish NZD bias. This shows the value of having multiple scenario-based setups ready, as changing market conditions throughout the week can validate different pairs at different times.
Plan For Sustained Breakout Moves
There are cases wherein markets barely look back from a strong breakout move, and some of the Kiwi pairs’ reactions to the weak NZ jobs data are strong examples of that. AUD/NZD also seemed unstoppable in its climb thanks to the strong fundamental arguments, breaking one key resistance level after another instead of pulling back, so it could also help to plan entries for one-directional moves instead of missing out entirely.
Hedge Against Macro Disruptions
China’s mid-week tariff announcement completely altered the trajectory for commodity currencies, demonstrating how quickly macro developments can overwhelm currency-specific data. Traders positioned in NZD/JPY or AUD/NZD faced unexpected headwinds as the China news trumped NZ’s weak employment figures.
Disclaimer: The forex analysis content provided in Babypips.com is intended solely for informational purposes only. The technical and fundamental scenarios discussed are presented to highlight and educate on how to spot potential market opportunities that may warrant further independent research and due diligence. This content shows how we cover a portion of the full trading process, and does not constitute that we ever give specific investment or trading advice. The setups and analyses presented on Babypips.com are very likely not suitable for all portfolios or trading styles.
Trade and risk management are the sole responsibility of each individual trader. All trading decisions and their subsequent outcomes are the exclusive responsibility of the individual making them. Please trade responsibly.
Trading responsibly means knowing as much as you can about a market before you think about taking on risk, and if you think this kind of content can help you with that, check out our BabyPips Premium subscribe page to learn more!